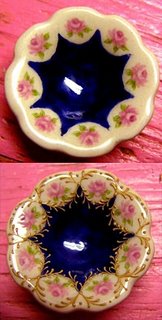
Last time I covered how china paint is transcluscent and requires multiple applications giving it a depth not seen in underglazes or acrylic paints. By comparing the photos you can see some of this effect. The top photo is after the firing from the photo in the previous post. There was also an additional firing of just the blue since it was still not even. This time I am adding a design feature that is not exactly china paint. It is a raised product that allows me to add raised design features that are intended to be gilded. As you can see from the photo this really dresses up the design that I had before and it is now beginning to look fancy. This product is called underlay for gold. It is also mixed with the glycerine and water (or can be mixed with oils) but to a thicker consistency and although you can apply it with a brush for some types of designs the most common application and the one that I have used here, is with a stylus. The design is built with a series of comma shapes and dots. These will remain raised after firing giving a texture to the finished design. This product is available in both a yellow color and a white. The yellow color is good if you are going to put gold over it because if you miss a tiny spot it won't show. The cobalt blue that is a prominent feature in this particular design will 'eat' the gold so in order to get a good result from gold application something like the gold underlay is necessary as well as being a pleasing addition to the design.
No comments:
Post a Comment