Showing posts with label jewelry. Show all posts

Wednesday, November 10, 2010

Still Crazy After All These Years

Hey most people agree that I'm crazy.  Usually they say in a good kinda way, so I can live with that.  I've always thought that Different was good.  But perhaps you wonder how did I come to do little stuff, how long have I been doing beads and jewelry type things.  So for any of you folks that might wonder any of these things I decided I would make this post and remove all doubt.  Yes I'm crazy and no its not a recent occurrence.  I've pretty much always liked little things.  I've done beads and small things pretty much forever.  And included in this blog are some photos of some really old things.  These items were all made back in the early 70's or maybe a bit earlier.  Some of them I remember exactly when others not exactly just sort of. 


This belt was one of the first beaded projects I ever did.  It is a belt that I loomed around 1970.  Did anyone show me how?  Well not really my mom basically said you put thread between the coils of the spring and string the beads on a thread go under the threads on the loom, push up the beads between those threads and then take the needle back through.  That was it.  I figured the rest out on my own.  How to do a 30 inch beaded project on a 10-12 inch loom, how to finish it off, attach it to leather, the pattern.  It took awhile but I had fun with it.

As I recall this was the second thing I did on the loom.  As you can see from this piece I've had an interest in my Native American Heritage pretty much forever.

Then about a year later or there abouts my dad and I took a lapidary and silver smithing class that was sponsored by the Gem and Mineral Club that he belonged to.

This star piece was the first piece I did in this class.  The cab is the first cab that I ever cut and polished.  It is a mexican lace agate.  It is also the first sterling silver bezel setting I ever made.  I remember the teacher trying to talk me out of the star points in the wire saying they would be very difficult to get soldered on right, but I was not deterred.

This turtle was the second of the projects that I did in the class with my dad.  The stone is a jasper.

Again I didn't choose a simple structure for this piece.  Not only is it a pin requiring pin components be soldered on but again a bunch of separate pieces to be attached to the edge of the bezel.  I've always sort of liked this turtle I think he came out cute.

I also made a ring with a jade cab but don't know where it is so no picture of that.


Later on perhaps that same year or maybe the following year I decided to make earrings to sell for Christmas money.

These I decided to made from Bread Dough.  This was way before Fimo or polymer clay came on the market and bread dough was the craft clay of the time.  These earrings were painted with acrylic paints.

The photos shown here are the ones that I had left.  I also made bears, mice and a few other things that I sold all of.  Here we have Hot Dogs 'n Sun, magic mushrooms, Baby Birds in nests, snails, light bulbs, woodchucks, and penguins.

The light bulbs are 75 watt as you can almost see.  I had lots of fun with these and I did make a bit of money for Christmas with them.  Yes tiny detailed pieces go figure I've been doing it forever.


 As a sophomore in High School I took another jewelry class this time in school.  This Belt Buckle was one of the first projects I did in that class.

It is a pierced copper piece on a brass base.  The copper part was sweat soldered onto the brass base then the piece was curved.  As you can see from this piece I've liked scrolly bits forever too.


This piece was a project where we had to texture the piece and dome it.  There are also earrings that match.  After I was out of school and no longer had the tools to mess with it I decided that it sort of needed something a bit extra on it and my good friend Patty added the beaded drop to the bottom of it.
 This piece and the next one were part of a rebellion that I pretty much led in the jewelry class.  The teacher we had never liked any of the designs we came up with.  This was supposed to be one of those nice red mushrooms with the white spots.  But the teacher said that design was too trite and that I couldn't do it.  She also had told one of the other students a similar thing.  So I still did a mushroom but had to alter the design.  This is copper enamel and as you can see by the chipped off places it hasn't held up so well.

The last photo was one that me and the other gal in the class brainstormed on to come up with something so weird that the teacher couldn't possibly say it was trite.  Something that was just strange enough that she would like it.  Can you guess the teacher loved the modern art type of things.  This one was designed based on cracked eggs because we both thought the teachers ideas were pretty cracked.

Ok there you have it a collection of Jewelry and beading from my past... the far far distant past.  Yes I've always been a bit odd a bit out there and definitely different.  I've always said "if unique is what you seek"

Wednesday, October 27, 2010

Exciting New Designs


Hello Everyone as some of you may know I've been busy for the last few weeks creating some new designs which I hope you will all find as exciting as I do.

First a little background.  In the past couple of years the popularity of Kumihimo, Viking Knit, and various other rope type necklaces has become increasingly popular.

The size of these ropes means that you either have to make a bail out of beads or find something with a very large hole.  As there doesn't seem too be many choices with large holes I decided to make a selection of slides and pendants to accommodate these large cords.

So today I would like to announce my new line of slides, pendants and cones that are made specifically for these large cord designs. 

I have the first of them all listed in the shop on my website in the 'New Items' category  

For a limited time I am offering an introductory sale price of 10% off the regular price. You will see the sale price in RED under the regular price and the discount will be applied when you check out.  This way you can see what the regular price is and your savings for jumping in early to try out these new pieces.

I have made several that are focal pendants on their own, such as the first photo shown here, as well as some slides that are decorative but also have a hole to make it easy to attach your own pendant to the cord.  The first photo shown to the right shows you one of these new designs from the front.  In the second photo you can see the large hole that goes through the back of the design.

I also recruited a couple of people to be guinea pigs for this project so I could make sure that they worked the way I envisioned and so that I could show you some beautiful finished pieces.   I would like to send out special a Thank You to Jennifer Van Benschoten of Van Beads and Linda Roberts of BeadsForever on Etsy for all their time, help and suggestions in this project. 

 Here is the first of those pieces I have to show you made by Jennifer Van Benschoten.  It is a lovely dutch spiral rope utilizing one of the slide sets that I call the 'Long Leafy Slide Set'.  She has hung a bead and a Peruvian ceramic leaf off the bottom of it accenting it perfectly.  This particular set has the largest hole in the slider of any of the sets and would easily accommodate multi strand designs as well as large ropes such as this one.  You can see more shots of this beautiful piece in the gallery on my website.  It is the Leafy Slider Necklace and it will be available for purchase from Van Beads 
This is just one example of the beautiful things you can make with these slides.  I will be showing you more project photos as they become available.


Any of you that know me know that I love large bold designs but really hate jewelry that it heavy.  So you will find that these slides and pendants while rather large are very lightweight and easy to wear.

Another problem with these large cords are how to finish them off at the end before you attach a clasp.  Most of the cones available are too small for the larger cords.  So I have also made a variety of cones.  Some of the cones will be sold separately in pairs others will be included with a matching slide as part of a complete necklace set. Such as this beautiful  round flower set.

One of the problems we encountered in this project was that some of the cones have a very large opening and they don't work as well with the smaller cord types.  So I am making all of the fancy cones in an additional smaller size that will work better with the smaller kumihimo cords and other smaller diameter cords.  This will make all of these designs even more flexible allowing for greater choices in the types of cords and sizes that you can use with them.  I'm anxious to see some multi strand designs in these as well.  I guess I'm a bit partial to multi strand pieces but I think they have lots of interest and movement making them lots of fun both to do and to wear.

I have made up a variety of these designs in various colors and styles and I hope that you will embrace them and use them for your holiday necklace designs.  Visit the BEAD SHOP to get your introductory discount.

Friday, October 24, 2008

The Witch and the Pirate


The Witch and the Pirate. Sounds like a good name for some fairy tale doesn't it? Here are today's installment of the faces in the window. I hope you all like them. Ya gotta tell me which ones are your favorites and why. I like to know these things. I think this witch has a lovely sneer on her face. And the squinty eye makes her look nice and mean. I had so much fun doing these.

The pirate. He has a gold tooth you know. Though he needed one. His ears are pierced as well as his nose so he'll end up with some gold rings here and there as well as the gold tooth. After I finished him up I looked at him and said I think he looks like Gomez from the original Addams family TV series. What do you think? Do you agree?

Thursday, October 23, 2008

Funny Faces part 2


Well I've finally finished my income taxes and got them filed for 2007. Nothing like waiting 'till the last minute. I've now gotten my funny faces all painted and they are on their way to Christi for the silver. I'm really anxious to see them with the silver roofs and doors. I think these will be a fun product. I'd really like to hear from you folks how you like them, what you think and any related things that you can think of. Its always fun to brainstorm and this is how I come up with new products so please comment.

I managed to complete 11 different faces. I'll post a few every day until I get them all posted up here so be sure to check back and let me know which ones are your favorites. Today I've put up the ones that I teased you with when I started this project. The Kilroy and the Kissy Face elf. Tomorrow perhaps a witch or the pirate.

Saturday, September 27, 2008

By Popular Demand.....


More crazy and funny faces. After posting the 'Wild and Crazy Guy' lots of people have commented that they would like to see more of this sort of thing. Also I was chatting to another artist at a recent show and we came up with a plan. This plan is going to be where the next funny faces will be appearing.

She does wonderful PMC and we decided to do some of the funny faces that will be looking out of windows. She will be doing PMC roofs, doors/shutters on the windows. You'll open up the cute little houses and be confronted with my funny faces.

So here's a sneak peek at the first of the faces. These I just finished building. They haven't been fired yet so there will be more details painted on after they are fired and the colors will be much more vibrant. I just wanted to let you all know that they will be available later on. I would love to hear your comments on these guys and any suggestions for more faces are always welcome. I love to hear what you like, what you are looking for.

Wednesday, September 17, 2008

New Goodies


Hello Everyone I'm back from my show and I've updated my website. I've put all the new things on you can find them in the Bead Shop New Category I've done some new whimsical animal beads, and several new focals. Also the Porcelain canvass pieces that I discussed in the previous post are all done now and are also in the shop. You can find them with this link Porcelain Canvass

Friday, August 29, 2008

New Photo


Ok as promised here is a shot of some of the little porcelain canvass' I've been working on. These are sitting ready to be fired after being painted. I would love to hear from some of you that do PMC if you agree with me that these would be great framed with PMC. I have a bunch more of these to complete before my show including more oriental designs. There are about 3 or 4 oriental ladies in kimonos standing in various poses and maybe another oriental floral still. Also more fairies. It would also be good to hear from you which designs you folks like best. I always like to hear what people are looking for and what they like the best. Oh the photo is not the best it is a phone photo. I'll put up good photos of them once they are all done.

Monday, August 25, 2008

What's New

With a show coming up in less than two weeks I'm madly working to get some new things ready for the show. One thing I'm doing are some 'porcelain canvass' paintings. Porcelain canvass are very thin, very white industrial strength porcelain. Although these are now somewhat difficult to find they used to be easy to get at china painting shows. They come in a variety of sizes and are sold for painting portraits and scenes on for framing as they are much thinner than a tile. They are very translucent and lovely to paint on. I have managed to cut some down to sizes that will be suitable for pendants and I'm painting some oriental designs an some fairies on some. I think these will be wonderful for pendants with PMC frames made around them. I should have some of the paintings finished in a day or two and will post some photos then.

So I'll be in Tucson September 5,6,7 at the Fall Best Bead Show. I will have the paintings available for sale at the show so stop by and see me. I'll be in booth 69 just across from the registration table.

Monday, June 23, 2008

Christmas is coming


Hello everyone. I know that summer has just barely arrived and that people rarely think about Christmas before thanksgiving but here we go. I've been madly pouring snowbabies and a few of some little Christmas charms and it occurred to me that I should let people know. I've been having a flurry of inquiries about these things by those fore-thinking people that are nothing like me and they have spurred me into action. Thus the pouring. Since I am a glutton for punishment and I figure its only fair that everyone have a chance at these guys I figured I'd put it on the blog.

Since its just me, one artist, doing all the work the quantities of them is very very limited. I've poured around 200 snowbabies and significantly less of the little charms and I'm about at the limit of what I can accomplish by fall. (I also have orders for other things that I need to work on at the same time) So here's the scoop. Around half of the snowbabies are already spoken for and its looking more and more like I'm not likely to have any left to put on the website. So if you want snowbabies this year you need to contact me asap and get on the list. Same goes for the little Christmas charms.

Snowbabies are $15 each and as long as I have all the poses available retail buyers can choose individual snowbabies. You can see all the poses here: Snow Baby beads Photo Also four posts down on this page. The christmas charms I will be selling in sets there are five in each set as can be seen in the photo to the right. The cost of the set is $40. These charms are tiny so the detail on them is very fine they are less than 1/2 inch tall, so in the photo they are greatly enlarged. I will be starting a list for them on a first come first served basis as well. There will also be available 'snowballs' These are just round beads that match the snowbabies. They are available in 12,14,16,18,20, and 22mm. They are $2 each for 12&14mm, $4 each for 16&18mm, and $5 each for 20 or 22mm.

Thanks to everyone for all their interest in my work. I look forward to hearing from you all.

Thursday, April 17, 2008

A wild and crazy guy


For all of you that like the wild and crazy guys I've got a new creation to show you. He is a woodland spirt of some sort. I think he has been hiding in the bushes and under bridges too long. I've seen lots of images that are similar to this and decided I finally needed to put one in porcelain. He is made of colored porcelains and all hand built. He is mostly light and dark brown colors. I think he is cute in a wild and crazy sort of way. For some reason this sort of thing really appeals to me. He is another of the new pieces I am trying to get done for the Phoenix Bead Expo which is May 2-4 here in Phoenix. You can get more information about the Bead Expo on my website Amazing Porcelain in the calendar section. I would love to hear what you think about him.

Sunday, April 06, 2008

New Flower Fairy


Ok Back again finally. Been really busy, no excuse I know but that is really all I had to say over the last few months it seems. Nothing interesting to post about. Well today and yesterday I finally got to do something fun. Well mostly today. Yesterday got ate up assembling all the necessary tools, materials etc. So today mostly I built a flower fairy pendant. The fairy itself is cast but the clothing, wings, and the flower its sitting in are all hand formed. It is made out of colored porcelains and hasn't been fired yet so the colors are not real apparent. I will paint her face and probably add some details here and there after it is fired. They take quite awhile to build so the price will not be cheap probably $50-75, so I'd really love to hear back from everyone on how you like her and if you think these are a good idea or am I wasting my time. If I get a good response I'm going to try to have at least a couple of them at the Phoenix Bead Expo next month. Thanks for looking and your comments.

Friday, July 13, 2007

Confetti Heart Necklace


This Necklace is created using one of my multi strand sets. There are multiple holes in the top on each side of the heart and corresponding holes in the lower edge of the small hearts. As you can see the idea is to help maintain the desired order of the multi strands allowing you to set up the way the necklace is going to hang. This gives the designer an advantage over simply putting multiple strand through a large hole bead in that they have some control over how the strands will lay. This necklace has five holes that can be used on each side of the necklace and additional strands were added as well. Two main strands on each side were strung with beadalon cable for strength. The additional beaded strands were strung using dandyline for flexibility. Then the decorative wire mesh was added just for show. I wanted this necklace to look a bit chaotic like confetti in the breeze so I used the multiple colors and added sequins to enhance the confetti look. For a larger image have a look at the Deviant Art Page

Tuesday, May 01, 2007

Organic Dreams


Last fall when I created these organic pieces I didn't have the time to do up any examples of what could be done with them. Finally I've been taking some time to dress some things out. Here is one example of the sort of thing that can be done with the organics. For this one I've strung in some swarovski crystals, seed beads and some hematite stars. To see more of the 'blank canvasas' look under 'free forms' in my shop.

Saturday, April 28, 2007

Pipestone Pendant


Ok I know its been three months. I've been busy but not on art. You know how it goes, there are taxes and websites and houses that need attention. Well finally back to art. Here is the latest pendant I've created. It is hand carved out of Minnesota pipestone(catlinite)and inlaid with PMC (precious metal clay). The underlying circle design is borrowed from the mound builders. Designs similar to this were found on carved shell gorgets (pendants) and on large stone circles called sun circles found in mound builder ruins. On one side there is a pipe superimposed over the snake design combining the tradition of the pipe with the ancient snake design. On the other side (below) you can see that the tail of the snake is over the protrusion of the pipestem from the first side. Let me know how you like this latest departure from porcelain.

Monday, January 22, 2007

Hot out of the Kiln


Hello everyone. This is one of the last pieces I will finish before the To Bead True Blue show in Tucson. This is probably my favorite piece of all the ones I have done leading up to this show. I could easily keep it for myself. I would be interested to know how the rest of you like it.

Tuesday, November 14, 2006

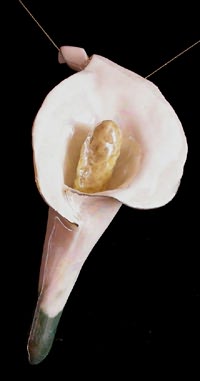
Cala Lily


This is one of the cala lily pendants that I have done. They are all porcelain and finished with Mother of Pearl and a gold trim.

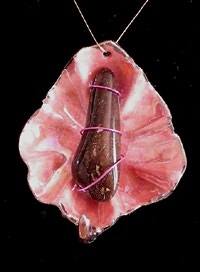
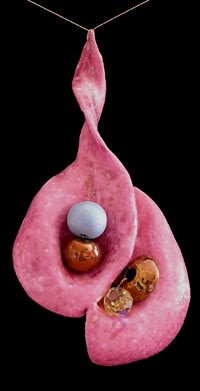
Organics


These two items are examples of my new 'Organics' line. This is only two of the rather simple shapes that I have come up with for this line. Also included are some leaf shapes with little tendrils, shell shapes, flower shapes, and some more abstract shapes. The idea with the organics is that the designer who buys the item would include beads, a wire wrapped stone or some other object inside the 'Organic' component. These two are shown with a very simple inclusion of a stone or a few beads just to give you the idea. The 'Organic' is designed to be a sort of frame to set off a special stone, bead, charm, etc. and as such each comes with holes to attach the special piece. I can envision them with added wire spirals and curls or interesting groupings of crystals. The possibilities are limited only by the imagination of the designer. These are designed to add a focal point and greater interest to an otherwise simple design. A jumping off point to take a design to a higher level and give it more shape and interest than simple beads or stones alone. I hope you are as excited about the possibilities as I am.

Sunday, November 12, 2006

Flower Cones

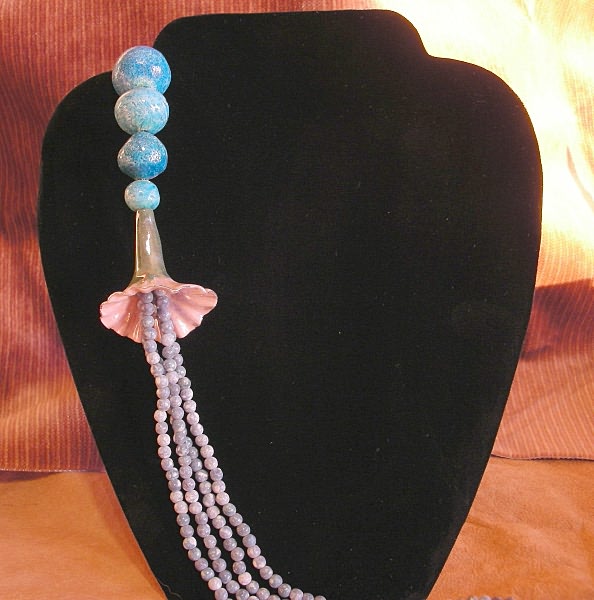
flower bead cones
Hello everyone. Yes its been forever. Been working hard on getting some new things done and putting some new ideas into porcelain. Here is one of the things I came up with to add a little bit of interest and dimension to those multi strand necklaces that are so popular these days. Every one has seen the pretty silver cones but they are not terribly flashy and are mostly just findings to connect the strands into one. Very functional but they don't really add any pizazz to the design, at least that is how I look at them. I've seen filigree ones and shiny plain ones I've seen lots but I've never seen one that really adds some punch to the design. So I decided that I would try and come up with some that are in and of themselves design elements and really add some punch to the design. The first ones that I am presenting here today are flower shaped. As you can see in the photo the idea is to place them at about collar bone level or a bit lower and to continue on above them with a single strand. I will add another more abstract looking one another day. I would love to hear your reactions to these.

Wednesday, September 27, 2006

Potpourri Heart


This is my most recently completed pendant. This is a new idea I had. I call it a potpourri heart. You will notice all the small holes around the edge. This pendant is hollow and there is a relatively large hole near the top at the back. The idea is to fill the pendant with cotton and then put a few drops of essential oil on the cotton through the large hole in the back. When the pendant is worn the fragrance will diffuse out of the small holes in the front. This will enable people that experience skin irritations from the contact with the oil to wear fragrances as the oil will not be in contact with the skin. Also people that find that certain fragrances that they like smell awful on them because of their body chemistry can now wear those fragrances.


For those of you that are interested in the process I have included a photo of the pendant after four of the five firings. There is one additional firing between the third and final photo. I forgot to take the fourth photo but this should give you an idea of how the design is built and how it progresses with china paint.

This pendant is porcelain hand painted with china paints.

Sunday, September 17, 2006

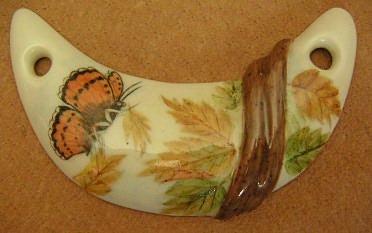
Butterfly Pendant


Another new pendant in the works. This one I painted up for a fall challenge. It is another of the new shapes I'm working on. Just got some more out of the kiln today so will be painting more soon. Again I welcome any comments.

Pendant: Hand painted porcelain.