Friday, October 29, 2010

Dragonfly Slide Necklace

Hello Everyone here we are with installment two of my New Slide Designs. This gorgeous necklace is the second of the samples that Jennifer Van Benschoten of Van Beads has done. You can see more photos of this wonderful necklace on my website in the gallery Dragonfly Slide Necklace This one has got to be my favorite so far. I can hardly wait to see what she does with the cab she has and the other slide too. I really like the golden colors and they are so perfect for fall too. The seed beads she chose to go with this slide are just totally perfect.  This is a perfect example of how these pieces can go together with a nice rope and result in a fabulous necklace.

Here is another of these slides. This one has head pin loops added across the bottom for a fringe. This is an option that I may include on several of the designs if people like it. Let me know what you think.  I also have a couple more of these that I still have to photograph.

I have also added views of the sides of most of these slides now so you can see the holes in the sides of each style. There are a few more designs and styles that I still have to finish so I will be adding those as they are finished as well as the new samples that are still to come.

I hope you will all visit the Bead Shop frequently.

Wednesday, October 27, 2010

Exciting New Designs


Hello Everyone as some of you may know I've been busy for the last few weeks creating some new designs which I hope you will all find as exciting as I do.

First a little background.  In the past couple of years the popularity of Kumihimo, Viking Knit, and various other rope type necklaces has become increasingly popular.

The size of these ropes means that you either have to make a bail out of beads or find something with a very large hole.  As there doesn't seem too be many choices with large holes I decided to make a selection of slides and pendants to accommodate these large cords.

So today I would like to announce my new line of slides, pendants and cones that are made specifically for these large cord designs. 

I have the first of them all listed in the shop on my website in the 'New Items' category  

For a limited time I am offering an introductory sale price of 10% off the regular price. You will see the sale price in RED under the regular price and the discount will be applied when you check out.  This way you can see what the regular price is and your savings for jumping in early to try out these new pieces.

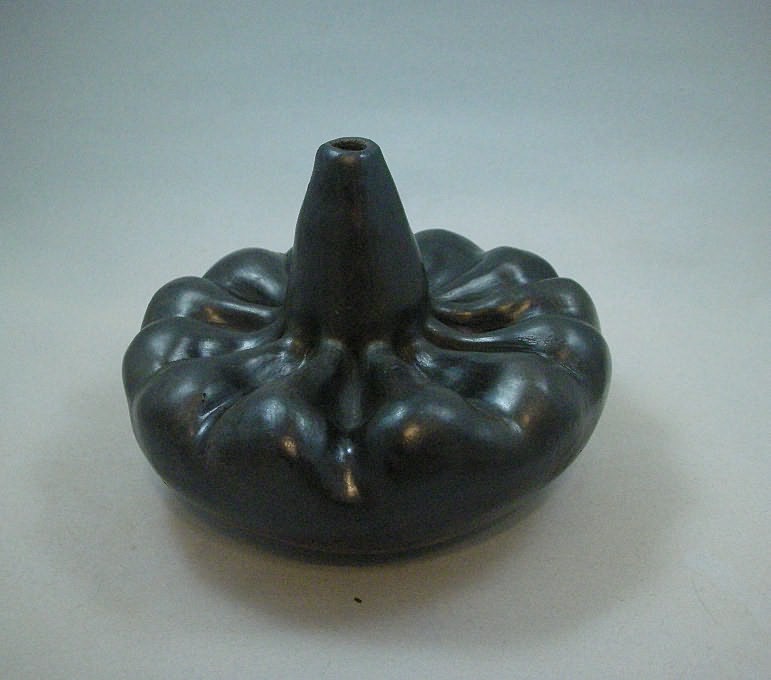
I have made several that are focal pendants on their own, such as the first photo shown here, as well as some slides that are decorative but also have a hole to make it easy to attach your own pendant to the cord.  The first photo shown to the right shows you one of these new designs from the front.  In the second photo you can see the large hole that goes through the back of the design.

I also recruited a couple of people to be guinea pigs for this project so I could make sure that they worked the way I envisioned and so that I could show you some beautiful finished pieces.   I would like to send out special a Thank You to Jennifer Van Benschoten of Van Beads and Linda Roberts of BeadsForever on Etsy for all their time, help and suggestions in this project. 

 Here is the first of those pieces I have to show you made by Jennifer Van Benschoten.  It is a lovely dutch spiral rope utilizing one of the slide sets that I call the 'Long Leafy Slide Set'.  She has hung a bead and a Peruvian ceramic leaf off the bottom of it accenting it perfectly.  This particular set has the largest hole in the slider of any of the sets and would easily accommodate multi strand designs as well as large ropes such as this one.  You can see more shots of this beautiful piece in the gallery on my website.  It is the Leafy Slider Necklace and it will be available for purchase from Van Beads 
This is just one example of the beautiful things you can make with these slides.  I will be showing you more project photos as they become available.


Any of you that know me know that I love large bold designs but really hate jewelry that it heavy.  So you will find that these slides and pendants while rather large are very lightweight and easy to wear.

Another problem with these large cords are how to finish them off at the end before you attach a clasp.  Most of the cones available are too small for the larger cords.  So I have also made a variety of cones.  Some of the cones will be sold separately in pairs others will be included with a matching slide as part of a complete necklace set. Such as this beautiful  round flower set.

One of the problems we encountered in this project was that some of the cones have a very large opening and they don't work as well with the smaller cord types.  So I am making all of the fancy cones in an additional smaller size that will work better with the smaller kumihimo cords and other smaller diameter cords.  This will make all of these designs even more flexible allowing for greater choices in the types of cords and sizes that you can use with them.  I'm anxious to see some multi strand designs in these as well.  I guess I'm a bit partial to multi strand pieces but I think they have lots of interest and movement making them lots of fun both to do and to wear.

I have made up a variety of these designs in various colors and styles and I hope that you will embrace them and use them for your holiday necklace designs.  Visit the BEAD SHOP to get your introductory discount.

Monday, August 23, 2010

Santa Fe Indian Market Report

Hello everyone. My first appearance at Santa Fe Indian Market as a vendor has been a wonderful experience. The drive to Santa Fe, although rather long was enjoyable. The Santa Fe Indian Market is one of the largest juried Indian Markets in the country with 1400 artists artists this year. It truly is the place to see the best Indian art and people from all over the world come to this market. I met people from France and Luxembourg, heard a couple of Germans, and another whose language I didn't recognize. Expected attendance was around 80,000 each day. By all accounts the attendance was down perhaps as much as 40% off that figure but still 40,000 people is darn good attendance to a show each day, in my opinion at least. Of course, attendance means nothing unless they buy art, but more on that in a bit.


We arrived in plenty of time on Wednesday to find the location and get art work turned in for the big competition. I was a bit worried when they moved the Birdman Dancer Effigy Bottle out of the pottery division and into the sculpture/clay division. I wasn't sure if that would be a more difficult place for it since it is a bottle and there limitations in how you can sculpt a bottle. Consequently the waiting to find out the results of the competition were that much more difficult.


On Thursday we went up to Santa Clara Pueblo and visited my new friend Judy Tafoya of Santa Clara Pueblo Pottery. We helped her with some computer issues and had a good visit. Hopefully she will now be able to get some more info out on her website. One of the things that I do is to help other artists with their websites.


Friday morning we went to the El Dorado Hotel where there were two more art shows going on. The shows in the Hotel ran from Friday through Sunday, whereas the SWAIA Indian Market was only on Saturday and Sunday. This gave us time to have a good look around and chat with some of the artists from those shows.


After a short break back at the hotel and some dinner we were off to the artists reception to see the results of the competition. As we waited in line to get into the reception we chatted with another of our artist friends Argus Dowdy of Four Winds Indian Art. Argus is a fantastic pipe maker and stone sculptor. His pipes are the best I have ever seen and I know several people that agree with me on that point. He has won numerous prizes at Santa Fe Indian Market and other shows across the nation, so there was little doubt but what he would win a prize.


Once we got into the reception I had to find the pottery and sculpture sections to see if I had won a prize. I found the pottery and the miniatures first and discovered that my Mother and Child Effigy Bottle did not win any prize. She was beat out by a set of three playing bears. Ok, well you can't win 'em all. So off to find the dancer and see if he had any better luck. Low and behold he had won a second place. So once again I had managed to get a ribbon and this in on of the stiffest competitions in the country. Needless to say I was very happy with this result.


Next we went to locate pieces the other artists we know had entered. As expected Argus won both 1st and 2nd place in the pipe category. A couple of the other artists that we know slightly were not quite as lucky, although they often do win big prizes. We continued to look at all the wonderful artwork that had been entered into competition and chat with some of the other artists. One of the really nice things about this reception as compared to some other competitions, is that they show all the work that was entered rather than just the prize winners. This is great because you get to see lots more art plus you get to see what all you were up against. We left the reception at bit early so we could get a good night's sleep before the big event started.


Set up started at 6:00 am for us and we were in the second group to set up. At the beginning we were doing it by flashlight. Apparently there were customers waiting at some booths as early as 5:00 am. We had some early bird customers coming by as soon as it began to get light. Saturday went very well for us, although everyone was saying it was way down. Since this was my first year at market I had no reference for that, but I was reasonably happy with the results. Usually at shows Sundays are slower so a reasonable result on Saturday does not mean its time to celebrate.


Sunday started off a bit slow but lots more customers than I am used to seeing at the previous shows I have done. As the day went on it became apparent that it was going to be a good day as well. In the end we did just about the same $ amount on Sunday as we did on Saturday. Overall I was very happy with the results of the show. Now for the long drive home.


A successful show like this is so satisfying. If only they were all so good. I am very thankful for a good result and feel very fortunate as well for there were many other artists who did not fair so well this weekend. It is good to be one of the fortunate ones.

 Now to switch gears.  Its time to make beads and minis.

Monday, June 28, 2010

Going Native

As a Native American artist attending Native American shows and selling Native American pottery one must pursue the ancient methods if one wants to enter the competitions. At most Native American shows there are competitions where you have the potential opportunity to win significant sums of money, at least as much as part of your booth fee. It is also a good opportunity to become better known in the Indian art community. These shows are all juried and quite competitive. I am a rather late comer to the Native American art market. Many of the artists I compete against have been doing their art since they were practically babies.

So far I have only made it into the pottery categories at these markets. I have been doing one sort of ceramics or another for more than 20 years but I've always bought my clay at the ceramic shop and fired things in an electric kiln in the past. For Native American show competitions this severely limits my prospects for prizes as most pottery categories in the pottery competition require that the items be made from Native materials and Traditionally fired. This means you have to dig and refine your own clay and fire it outside in a wood fire. Furthermore many of the traditional pots are black.

Scientifically getting black pottery from red clay is a simple result of having the pottery in an oxygen starved atmosphere, known in the pottery industry as reduction, at a specific temperature when the iron oxide that makes the clay red is somewhat unstable. At this point it will give up oxygen to the starved fire and in doing so changed from iron oxide to iron magnetite (Fe3O4 which has only 1.33 oxygen atoms for each iron atom) If it is fired and cooled in an oxygen rich atmosphere the iron oxide in the clay becomes red hematite (Fe2O3 with 1.5 oxygen atoms for each iron atom). The black clay can be made red again by once again raising the temperature to that point in an oxygen rich atmosphere.  You may have seen some native pots that are mostly black but have streaks of red here and there.  They accomplish that with a torch on the surface of the pot, thus bringing that area of the pot to temperature in an oxygen rich atmosphere.

Now this all sounds very simple and straightforward sort of like the way those glasses will get dark in the sun and clear again in the shade. But in a wood fire it is a bit more complex as I have discovered. Some of the information I have is empirical and not as scientifically defined as the basic process above. If you have a fire that is somewhat starved for oxygen but is still burning you tend to achieve partial reduction which turns the clay a sort of gray-tan color like the pot in the photo to the right.  How it ends up tan I'm not sure perhaps is it an optical illusion.  You can see streaks and areas that are more gray.  I would have expected to see it more of a red with gray areas but that is not what we ended up with here.  But I am not a chemist so I don't know what the iron did in this pot except that it didn't turn all the way black and it didn't really stay red.  So I know empirically that the fired had too much oxygen through that critical temperature range to turn black but not enough to be red.  Now these colors are 'in' the clay not on the surface.  This is not a residue that sits on the surface of the clay.

Ok so this should be pretty simple starve the fire and it will go tan starve it to the point of extinguishing it and it will go black.  But sealing up a fire even one in an enclosed area such as a barrel, kiln, or pit is harder than it sounds because there is oxygen everywhere and you have to seal it up pretty good.  The tan pot was from the first firing that I made in my artificial 'pit' enclosure.  Due to fire regulations I can't just dig a pit in the ground and start fires in the open during wildfire season so I have to have the fire enclosed.  Some people do this in 55 gal steel drums I built a brick enclosure.  Logic says when you get the fire as hot as you want add extra fuel and then seal up the enclosure.  The additional combustable should burn up all the available oxygen and you should have black pottery.  Well that might be true if you could just hermetically seal up the enclosure but as I found this is not very likely.  We plugged the opening where we were feeding the fuel in and plugged the opening that was acting as a chimney.  It did start smoking but the fire pushed its way out around the plugs.  We put dirt over it and kept putting dirt here and there over every little place that we could see smoke and fire emerging.  Thought we did a pretty good job of sealing it up but in the morning I still had live coals which means that somewhere there was air still getting in.

For the second firing we sealed up the enclosure a bit better and tightened up the plugging methods.  Also we added a common combustible/smothering agent that is used by many Native American potters to smother their fires, cow dung.  We added this through the chimney hole right on top of  the pottery.  At the same time we plugged the fire hole and then plugged the top as well.  Well we produced more smoke than you can imagine and still had smoke pouring out in numerous places.  Places you can't imagine even like out from under neath the enclosure which is sitting on concrete bricks.  More dirt over everything and as you can see most everything ended up pretty black.  But there are a few anomalies for example the tiny pot shown on the left.   As you can see his head is tan while his body is black.  How in the heck did that happen?   I'm not totally sure but the only thing I can guess is that the cow which was covering him continued to burn with enough oxygen through the cooling period and he somehow just didn't go all black.  Some of the pots that were on the edges of the enclosure such as the bowl and ones that were totally covered with the cow also have small areas that aren't totally black.  And again I still had coals in the morning so air is getting in somewhere.

So the quest goes on.  You can see photos of all the pieces in these two firings in my Facebook photo album Wild Clay Fired   Previous Native pieces are on my Native American Art page at Natika's Native American Art   Most can bee seen in the gallery or in the pottery shop.