Friday, June 30, 2006

Making a two part mold part 3


Once the clay has been built up to the parting line and the clay is squared off all around, it is time to smooth it out. In the top photo to the right you can see me using a sponge to smooth out the clay around the pieces. In the middle photo you can see the result of this process.

Next is the final smoothing and filling to get the clay perfect up to the parting line and to make it come up to the edge of the pieces in a smooth line with no little gaps and no extra clay sticking to the piece. Do do this take a flat brush that has soft but reasonably stiff bristles and wet it. Squeeze off excess water between your fingers so that you don't leave a puddle of water on the clay. Then use the brush to clean the edge of the model and refine the line where the clay meets the model. You can see me doing this in the bottom photo. During this process you will find small areas that need a tiny bit more clay or where a bit should be removed. After adding tiny amounts you can smooth it out with the brush. Continue in this manner until the surface of the clay is smooth and the line where the clay meets the model is even and crisp.

Making a two part mold part 2


The next step is to build up and fill in with clay to the parting line all around the models. The clay should be filled in carefully and should go straigh out from the parting line not slant downward to the edge of the mold. Keep the edges of the mold clean by frequently running a butter knife or similar tool along the grooves to shape the clay into a right angle at the edge of the groove. In the photo to the left you can see this process from several angles.

Making a two piece mold part 1


Often I am asked how I make molds. So I have decided to go through it step by step. I will be putting up the steps that I use to make molds. This will not contain all the little tips and tricks but more of an overall view of mold making. I plan on putting together a more complete tutorial including details of the exact tools, special tricks and tips and about twice as many photos. This tutorial will be available on the website for a small fee.

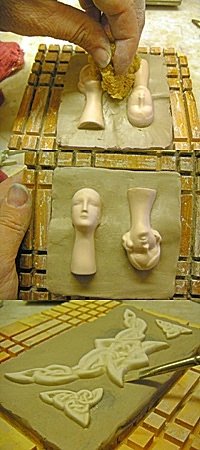
Today I will begin with the basics. In the photo to the right at the top you can see the board that I use to build my molds on. This is simply a piece of 1 X 6 X 6 (actual dimensions are about 3/4 inch thick X 5 1/2 inches X 5 1/2 inches the nominal size for commercial board called 1 X 6) This board has grooves cut across in all four directions 1/2 inch from the edge and 1/2 inch apart in toward the center leaving about a 2 inch square in the middle without any grooves. The grooves were cut on a table saw to a depth of about 1/8 of an inch and are the width of the saw blade. Depending on the type of saw blade you use this might not be sufficient. They need to be wide enough that the acrylic pieces seen to the right of the board will stand up in the grooves. With my saw blade it was a perfect fit and the grooves are about 1/8 inch wide. After all the grooves are cut the board has been given a couple of coats of varathane on both the top and bottom and in the grooves. Be careful not to fill up the grooves just give them a coat of the sealer. This helps prevent the board from warping. This board set up makes it possible to make molds that are as large as 5 inches square or as small as 2 inches square it also makes it easy to handle and turn so you can see the build up for the mold and get it right. It is not the only way to make molds it is just my way. The four acrylic pieces you see to the right of the mold board are the side boards. These particular ones are about 2 inches by about 5 1/2 inches long. If you are making molds of thicker things you will need ones that are wider (more than 2 inches) These were made by cutting up a piece of acrylic that was purchased at a home improvement store. Be sure to get the thin sheets that are about 3/16 inch thick so they will fit into the mold board grooves or take your mold board with you so you can try the fit.

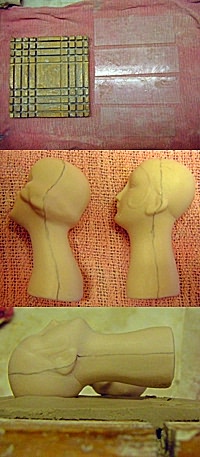
The second photo shows a pair of heads that I will be making molds from it is often useful to draw a line around the pieces you will be making a mold from to help in the clay buildup. This line should be at the widest point on the side of the item to prevent undercuts. When making molds of regular objects such as round beads or vases this is normally 1/2 way but with more complex shapes such as these heads it is a bit more difficult than that and care must be taken to draw the line on the area that the widest. It can be helpful to take a wooden pencil and shave away the wood on one side to reveal the lead along a long section. Then hold the piece you are going to mold on the table in the orientation that you plan to place it in the mold. Run the pencil around the piece holding the exposed lead against the side of the piece. This should put a line at the widest point. Personally I prefer to draw the line by looking at the piece carefully but this method works for some people. In the photo you can see the line that I have drawn.

The next step is to put a bed of clay on the mold board. I use what is generally referred to as school clay. It is an earthenware clay that is very smooth and has no grog or sand in it. I have been using the same clay for over 10 years and it originally cost me about $7 for 25 lbs so this is a pretty economical way of making molds. I keep my mold clay in a small tupperware box and use it just for making molds. The bed of clay should be about 1/4 inch thick and should be large enough to extend at least 1/4 to 1/2 inch out from the model in all directions. In this mold for heads the model is hollow so it must be filled with the clay. Fill it and flatten off the clay even with the bottom of the neck in this case. After you have the bed of clay on the mold board and a hollow model filled, position the piece(s) that you will be making a mold of on the clay. Pay careful attention that the parting lines that you drew in the previous step are horizontal and not slanted. Also that the pour hole end is vertical and not slanted. You can see this in the third (bottom) photo. Also notice that there is space under the neck of the closest head in the photo, this needs to be filled in with clay.

Friday, June 23, 2006

Anatomy of a China Painted Design part 5


In this photo you can see the final result. The gold has been fired. It is a bit dull in places and will shine better with a bit of polishing. Burnished gold frequently comes out of the kiln with a very dull finish. This has come out pretty bright. To finish off I will polish it with a glass brush. Since the shine of the gold does not show up well in the photo anyway I am not adding another photo of this piece. This piece is now completed.

Anatomy of a China Painted Design part 4


In the last installment I applied the gold underlay to the design. In the top photo here you can see that after firing it look nearly identical to what it did before firing in the previous post. It has flattened a bit and sunk into the glaze slightly although it is still raised there is less definition between it and the glaze at the edges. Now I will apply the gold. The gold I use for this design is a burnished gold. It is 18% pure 24K gold. In the bottom photo you can see the design after it has been applied. You can see that I have also applied white highlights to the roses for this firing. The white enamel that I use requires a lower temperature than does the gold underlay so it must be applied after the underlay is fired. On most china painted roses these highlights would have been wiped out with a rubber tool as the rose was painted, however, I find that in the very small roses I get a better result by using white enamel to put the highlights in at the end of the painting. If the gold covers well this will be the final firing for this piece. I have also put my name on the bottom of the piece for this firing combining what might have been two or more firings.

Tuesday, June 20, 2006

Anatomy of a China Painted design part 3


Last time I covered how china paint is transcluscent and requires multiple applications giving it a depth not seen in underglazes or acrylic paints. By comparing the photos you can see some of this effect. The top photo is after the firing from the photo in the previous post. There was also an additional firing of just the blue since it was still not even. This time I am adding a design feature that is not exactly china paint. It is a raised product that allows me to add raised design features that are intended to be gilded. As you can see from the photo this really dresses up the design that I had before and it is now beginning to look fancy. This product is called underlay for gold. It is also mixed with the glycerine and water (or can be mixed with oils) but to a thicker consistency and although you can apply it with a brush for some types of designs the most common application and the one that I have used here, is with a stylus. The design is built with a series of comma shapes and dots. These will remain raised after firing giving a texture to the finished design. This product is available in both a yellow color and a white. The yellow color is good if you are going to put gold over it because if you miss a tiny spot it won't show. The cobalt blue that is a prominent feature in this particular design will 'eat' the gold so in order to get a good result from gold application something like the gold underlay is necessary as well as being a pleasing addition to the design.

Tuesday, June 13, 2006

Anatomy of a China Painted Design part 2


Continuing with the bowl that was shown previously the photo to the left shows the bowl after the second firing (bottom) and ready for the third firing (top) As you can see by comparing the photo from the previous post with the bowl after the firing you can see that as the paint sinks into the glaze with the firing it also becomes transluscent and the true colors are revealed. Some colors are particularly difficult to obtain smooth even opaque coverage with than others. Cobalt blue is one such color. You will notice that even though the blue has been painted twice it is still pale in some areas. This is one aspect of china painting that makes it take a long time to complete an item, some colors require several coats of paint. This also makes it possible to achieve a lot of depth to a painting.

Before I mentioned that the china paint doesn't 'dry' or become permanent until it is fired. This provides us with some benefits and some drawbacks. There are two types of mediums that are used for china painting. The most common is a collection of various oils. When using oil based mediums turpentine is used to clean the brushes and in some cases to thin various products. The oils used are generally very aeromatic such as clove and lavender oils. This can be a problem for people with sensitivities and allergies. The other mediums that can be used are water based. I use a water based medium for china painting. This consists of glycerine and water. I use the water based mostly because the oils and turpentine annoy my allergies. Using this medium the paint will dry but it is not set or permanent until it is fired this is known as a closed medium (there are also 'closed' oil based mediums). Water based mediums have the benefit that they are not likely to run when fired like an oil based medium may if you apply the medium to heavily. The drawback is that the water based medium dries very quickly so that it is not easily worked and most oil based mediums even so called 'closed' mediums will remain workable for a longer period. An 'Open' oil medium will not dry and will remain workable to some extent until it is fired.

Because the paint is not set and it is applied to a glazed surface it can be changed it before it is fired. It can be wiped off or tiny sections of it can be wiped away to produce highlights or to straighten lines. This is true of both water based and oil based mediums used for china painting. Another benefit is that because it is fired after each painting session the previously applied paint is totally permanent and will not be damaged or removed in subsequent painting. This allows fine detail to be added after the base color has been painted and fired without changing the shading or shape of the previous painting and without smearing or mixing adjoining colors. The detail can be added and adjusted before it is fired. A pattern or line art design can also be applied and fired and subsequently colored without destroying the design. The drawbacks lie mainly in the fact that care must be taken in handling the unfired painting to prevent damaging the unfired painting. Another drawback is the longer time required to complete the artwork.

Sunday, June 11, 2006

The anatomy of a china painted design


Many people do not understand the time that goes into a china painted piece. Most people are familiar with acrylic paints where the entire design can be painted in one sitting. This is not the case with china paints. China paints are a transclucent paint and they do not 'dry' or become permanent until they are fired. To achieve depth and detail in a design it must be fired several times. Just how many depends on the design. So you can see what happens each time I am going to be posting photos of each firing of this bowl. The photos on this post show it after the first firing (top photo)and after the second painting has been applied but before it was fired the second time (bottom photo). I will be showing this after each firing so you can see how it progresses.

Saturday, June 10, 2006

Current Work


Many people ask how much I have to do or what am I working on so I have started this blog to sort of cover what's going on at my studio. I hope to cover what I'm doing and what is new and to answer questions interested parties may have about what I do. So if you have a question feel free to ask.

As many of you may know I'm pretty backed up on orders. Just how backed up am I well the photo to the right is a shot of all the china that I am currently working on for orders that I have. This is not for stock this is for orders.