Tuesday, November 14, 2006

Cala Lily


This is one of the cala lily pendants that I have done. They are all porcelain and finished with Mother of Pearl and a gold trim.

Organics


These two items are examples of my new 'Organics' line. This is only two of the rather simple shapes that I have come up with for this line. Also included are some leaf shapes with little tendrils, shell shapes, flower shapes, and some more abstract shapes. The idea with the organics is that the designer who buys the item would include beads, a wire wrapped stone or some other object inside the 'Organic' component. These two are shown with a very simple inclusion of a stone or a few beads just to give you the idea. The 'Organic' is designed to be a sort of frame to set off a special stone, bead, charm, etc. and as such each comes with holes to attach the special piece. I can envision them with added wire spirals and curls or interesting groupings of crystals. The possibilities are limited only by the imagination of the designer. These are designed to add a focal point and greater interest to an otherwise simple design. A jumping off point to take a design to a higher level and give it more shape and interest than simple beads or stones alone. I hope you are as excited about the possibilities as I am.

Sunday, November 12, 2006

Flower Cones

flower bead cones
Hello everyone. Yes its been forever. Been working hard on getting some new things done and putting some new ideas into porcelain. Here is one of the things I came up with to add a little bit of interest and dimension to those multi strand necklaces that are so popular these days. Every one has seen the pretty silver cones but they are not terribly flashy and are mostly just findings to connect the strands into one. Very functional but they don't really add any pizazz to the design, at least that is how I look at them. I've seen filigree ones and shiny plain ones I've seen lots but I've never seen one that really adds some punch to the design. So I decided that I would try and come up with some that are in and of themselves design elements and really add some punch to the design. The first ones that I am presenting here today are flower shaped. As you can see in the photo the idea is to place them at about collar bone level or a bit lower and to continue on above them with a single strand. I will add another more abstract looking one another day. I would love to hear your reactions to these.

Wednesday, September 27, 2006

Potpourri Heart


This is my most recently completed pendant. This is a new idea I had. I call it a potpourri heart. You will notice all the small holes around the edge. This pendant is hollow and there is a relatively large hole near the top at the back. The idea is to fill the pendant with cotton and then put a few drops of essential oil on the cotton through the large hole in the back. When the pendant is worn the fragrance will diffuse out of the small holes in the front. This will enable people that experience skin irritations from the contact with the oil to wear fragrances as the oil will not be in contact with the skin. Also people that find that certain fragrances that they like smell awful on them because of their body chemistry can now wear those fragrances.


For those of you that are interested in the process I have included a photo of the pendant after four of the five firings. There is one additional firing between the third and final photo. I forgot to take the fourth photo but this should give you an idea of how the design is built and how it progresses with china paint.

This pendant is porcelain hand painted with china paints.

Sunday, September 17, 2006

Butterfly Pendant


Another new pendant in the works. This one I painted up for a fall challenge. It is another of the new shapes I'm working on. Just got some more out of the kiln today so will be painting more soon. Again I welcome any comments.

Pendant: Hand painted porcelain.

Tuesday, September 12, 2006

Bracelet


Ok well I finally finished the bracelet that was in my head to match the wire wrap pendant I did last month. It is copper wire with iridescent glass baubels. Do you like the set? Let me know.


Sunday, September 03, 2006

New Pendant


Been working hard through July and August on orders but I did manage to complete this new pendant. This is a new style that I hope to have several of available soon with different sorts of flowers on. Would love to hear your comments.

Just to quell any confusion this pendant is made from Porcelain which has been fired to approximately 1200 degrees centigrade (about 2300 degrees Farenheit) It has been glazed and fired again. Then the design was added using china paint. This required an additional 3 firings to about 800C. Then the palladium accents were added requiring 2 additional firings of around 750C.

Monday, July 03, 2006

Making a two piece mold part 10


You have probably been asking yourself "How is she going to pour that mold she has forgotten to make pour holes?" Actually I find it much easier to make the molds without pour holes and to put them in at the end. They end up much more consistent and clean and the mold is easier to seal without funny lumps of clay around the edges. So that is what I will do now.

In the top photo you can see me marking the angle of the intended pour hole on one side of the mold. I use a sharp #11 X-acto knife to do this. Just score the shape of the pour hole at a nice angle.

Next use the x-acto knife over a trash can to carve out a half cone shape. (Middle photo) Pay attention to the tip of the knife while you are doing this so you don't cut into the cavity of the mold or poke it with the tip of the knife. Also be careful not to cut too close to the edge of the cavity. You should leave at least 1/16 of an inch that is flat on the end of straight pieces like vases or tube beads. Otherwise when you pour them removing the spare may cause some cracking down the side. This does not apply to round things like ball shaped beads.

When you have all the pour holes carved into one side of the mold put the mold together and use the cut side as a guide to mark the uncut side. You can see this process in the botom photo. (Again you should hold the mold with your opposite hand not as shown in the photo I had to use mine to hold the camera) I carefully stick the point of the x-acto knife into the hole and score the plaster on the uncut side by drawing it out along the edge of the cut side. Again be careful not to poke the end in too far and poke the actual cavity of the mold. Now take the mold apart and carve out the second side of the pour holes.

Put the mold back together after the second half has been cut. Now carefully take the x-acto knife and finish off the pour holes so they line up nicely on both sides and are nice and round. When you have finished open the mold and blow out any debris that has dropped into the mold. Then put it back together and put rubber bands on it to hold it tightly closed. Use a stylus to write on an edge of the mold what it is for. (After the first dozen or so it is helpful to know what a mold is for without having to open it.) Molds should always be stored with the parting lines horizontal and on un-sealed wooden shelves. This is recommended for several reasons. 1. rubber bands sometimes break and if you have the mold stored with the parting line vertical it may fall open and break. 2. Although not usually a big deal with small molds, storing a mold with the parting line vertically can lead to the mold warping and the parting line not fitting together as tightly as it did. 3. Un-sealed wooden shelves are recommended as they allow the mold to breathe and dry out between uses. A metal shelf may rust and that may transfer to the mold plus it will not allow the mold to breathe as well.

I hope you have all found this informative and useful.

Making a two piece mold part 9


Once the heat has gone from the mold you can remove the boards and clay from the mold.
The top photo shows the mold after the boards have been removed.

Now you want to take the shaper tool again and file off the sharp edges of the mold. This makes it look nicer, its easier on the hands to handle it and it is easier on the rubber bands. You can see this process in the middle photo.

In the bottom photo you see me using a flat knife like tool (a butter knife works but don't use a sharp knife) to open the mold. Carefully push the tool into the V shape groove and gently twist it slightly. Do this again on the opposite corner. You may need to do it a few times and possibly on each corner before it will 'pop' loose. Be sure to hold the mold in your hand holding both pieces together when you do this so you don't accidently launch part of the mold. In the picture you see the mold on a table because I had to hold the camera. The photo only shows the angle and location to put the tool, it is easiest to hold the mold in your opposite hand (left if you are right handed) and use the knife with your right.

Once it has 'popped' loose put it on the table and carefully lift the top piece straight up off the bottom. Don't try to open it like a hinged box as this may result in chipping away bits at the edges of the cavities. If necessary you can hold it with one piece in each hand and gently rock it back an forth slightly to get it to slowly come off the model.

When you have it open carefully remove the model pieces and clean up the mold. Use the shaper to file the edge of the second half of the mold just as you did on the first half.

Making a two piece mold part 8


The mold is now ready to pour the second half. But first we need to put the boards around it and seal it up. Be sure to use acrylic boards that are tall enough to allow 1/2 inch of plaster above the highest point on your model. You can see this by holding up the mold and looking through the side with the acrylic board in place in its groove.

In the top photo you can see how the acrylic boards are sealed on the outside both across the bottom edge and up the corners just as they were for the first half.

In the second photo you can see how the inside is sealed by pressing clay down into the little V shape groove between the mold and the acrylic that is created by filing off the corner of the mold previously. Be sure to pack the clay tightly into this crevice or the plaster will leak out. Pack it down and smooth it out to a nice smooth top surface. Also seal the corners the same as before.

In the third photo you can see the mold release being again applied to the mold and the side boards with a brush.

In the fourth photo you see that the mold release is being sponged off again just prior to pourin the plaster.

If your models are reasonably even front and back and you are pouring plaster into the same mold(s) as you did in for the first half there is no need to measure the molds again just use the same amount of plaster and water as you figured before. And again pour it in the same way.

Sunday, July 02, 2006

Making a two piece mold part 7


The next step is to carefully remove the clay from the plaster, clean up the mold, create the keys, and seal it. Carefully peal the clay off of the plaster. If you are molding several items that are virtually the same be sure that you keep track of which one goes in which hole, because although they look the same they may not be identical. This is especially true of hand made beads. Also pay attention to which side of the bead is in the plaster and which is out. Sometimes the pieces will come out in the clay as you remove it and you will have to clean them and replace them into the mold. If you don't get them back in the right direction you can introduce gaps which will allow the second pour of plaster to seep into the cavity of the first half of the mold ruining it. Carefully clean off all of the clay from both the plaster and the pieces. It is ok to wash the mold under running water at this point to remove the clay and dry it off with a towel. Don't soak it in water for any long period of time, however, just a quick rinse off.

In the first photo you can see me using an x-acto wood carving tool with a round end to cut the keys into the mold. You can also use the end of a spoon or the handle or a mellon baller to do this. What you want is a smooth rounded hole that has no undercuts.

In the second photo you can see me using a shaper to cut of the square corner on the edge of the mold. This eliminates the sharp edge and also makes it easier to seal the mold to the boards for the second half.

In the third photo you can see me brushing the mold release agent (murphy's oil soap) onto the plaster. At least two or three coats will be required. Let each soak in and dry before applying the next. Be careful not to let it run down into the mold cavity. Although this will not ruin the mold it will cause the first few castings to absorb unevenly and stick to the mold. The soap will come out after a few pours, however, so it is not a total disaster. Even if you are careful you will usually end up with a tiny bit right next to the seam line and the first few castings in a new mold are likely to stick in the first half of the mold.

Making a two piece mold part 6


Now the mold is ready to pour the plaster. I use USG #1 pottery plaster. It is designed to absorb water at a rate that is good for slip casting which is what I normally do. Ultracal is another plaster that is available, however, it is much denser and will absorb water much more slowly. It is not generally considered acceptable for slip casting. It is a harder plaster and will maintain the mold characteristics a bit longer but it is not suitable for slip casting. If you are making a mold that you will use as a press mold it may be ok. The plaster commonly referred to as Plaster of Paris is also not a good choice for molds. This plaster is formulated for casting objects that will be painted and as such it contains ingredients to inhibit absorbtion. You may have noticed that plaster of paris objects seem to have a shiny surface somewhat harder than the interior, this is because of these additives.

In the previous step the mold was measured and the cups of water required for the plaster was determined. My apologies to those of you that use cm instead of inches my only suggestion is to measure in cm then convert to inches. 250ml is approximately one cup and if you consistantly use the formula in the same way the results should be satisfactory. For each cup of water that you came up with in the previous step you need to weigh out 11 ounces (298 grams) of plaster. You can use a simple kitchen scale or postage scale for this purpose. If you have less than one cup divide accordingly. (ie: 1/2 cup water 5.5 ounces of plaster)

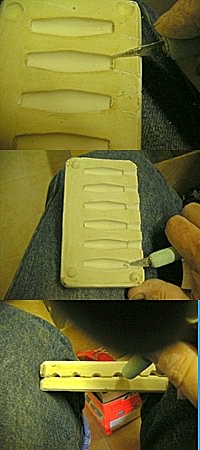
Measure the water into a mixing bowl. I have a rubber investment bowl that I use and it is very convienient. Dump the plaster all at once into the water and let it sit/slake for a couple of minutes. You can see this in the first photo. If you don't have a scale you can approximate by dumping plaster into the water until it makes a little mountain out of the top of the water. For a cup of water the mountain should be no more than an inch or two. This method will work but will result in molds that absorb differently on each side and may create some problems. The main reason for weighing and measuring is to achieve consistency which results in better casting and molds that will wear better as well.

After the plaster has slaked for a couple of minutes (All the plaster has gotten wet) stir it well with a dowel or chopstick or other round stick. A round stick will help to reduce bubbles that are introduced into the plaster. The corners on flat or square sticks create a current around the edges of them that introduce bubbles into the mix. Slaking the plaster prior to stirring also helps to reduce bubbles. Once you have stirred it well tap the sides of the bowl and/or pick up the bowl and drop it from maybe 1/2 inch off the table. Just high enough to jar it you don't want it to cause the plaster to jump out of the bowl. Alternately you can vibrate the bowl on a vibrator for a few seconds. These actions bring bubble to the top.

Now carefully pour the plaster into the lowest point on the mold allowing the plaster to rise up over the model. This method of pouring the plaster will tend to pull bubbles to the top and off the model as well. Once the mold has been poured gently lift a corner at a time maybe 1/4 in and let it drop. Again this helps dislodge bubbles. Or if you have a vibrator available you can again vibrate it for a few seconds. The second photo shows the mold after it has been poured.

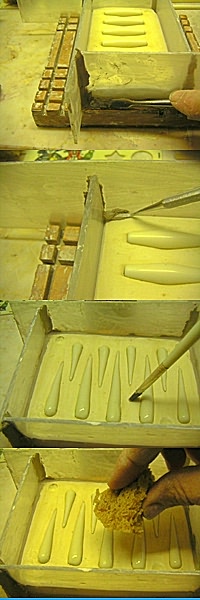
Plaster is a chemical reaction and it produces heat. As the plaster begins to set it will heat up. When the heat is completely gone from the mold you can remove the boards and take the mold off. The third photo shows me using the flat tool and running it between the clay and the mold board to loosen the clay from the board. You want to be careful so that you do not damage the fresh plaster. After you have loosened the clay you should be able to twist it off the board by twisting it. See the bottom photo.

Saturday, July 01, 2006

Making a two piece mold part 5


The next step is to determine the amount of plaster required for the mold and to apply the release agent.

In the top two photos you can see the measuring of the mold. You must measure the length, width, and depth of your mold. The depth should allow 1/2 inch of plaster above the top of the item you are making a mold of. Multiply the length times the width times the depth. Then multiply this number by 2 divide by 3 then divide by 15. This gives you the amount of plaster you need in cups of water required.

In the third photo you see the release agent being applied to all surfaces of the mold and the surrounding boards with a brush. I use a mixture of 1/2 murphy's oil soap and water. This is a cheap and very effective release agent. You can purchase special soap for mold making at ceramic stores but it is more expensive and doesn't work any better.

After the release agent has been applied you should take a damp sponge and sponge it off gently. Sponge off all of the surfaces that the release was applied to. Excess soap left on the surface of the clay or next to the model will cause the plaster to not set properly and will ruin the mold.

Making a two piece mold part 4


The mold is now ready to place the acrylic sides on and seal it shut. The photo on the left at the top shows the outside of the mold with the acrylic pieces held in place with clay pressed into the corners and against the mold board and the acrylic at the bottom. When doing this insure that the acrylic pieces are standing vertically not tilted in or out.

The second photo from the top shows the sealing of the edge of the clay on the inside of the mold against the acrylic. The third photo shows the sealing of the inside corners.

The bottom photo shows a mold sealed and ready to go. Be sure that you carefully seal all of the edges in this step or when you pour the plaster over the mold it is likely to leak out. When it does it usually fills in the grooves on your mold board. This is difficult to clean out and makes a big mess.

Friday, June 30, 2006

Making a two part mold part 3


Once the clay has been built up to the parting line and the clay is squared off all around, it is time to smooth it out. In the top photo to the right you can see me using a sponge to smooth out the clay around the pieces. In the middle photo you can see the result of this process.

Next is the final smoothing and filling to get the clay perfect up to the parting line and to make it come up to the edge of the pieces in a smooth line with no little gaps and no extra clay sticking to the piece. Do do this take a flat brush that has soft but reasonably stiff bristles and wet it. Squeeze off excess water between your fingers so that you don't leave a puddle of water on the clay. Then use the brush to clean the edge of the model and refine the line where the clay meets the model. You can see me doing this in the bottom photo. During this process you will find small areas that need a tiny bit more clay or where a bit should be removed. After adding tiny amounts you can smooth it out with the brush. Continue in this manner until the surface of the clay is smooth and the line where the clay meets the model is even and crisp.

Making a two part mold part 2


The next step is to build up and fill in with clay to the parting line all around the models. The clay should be filled in carefully and should go straigh out from the parting line not slant downward to the edge of the mold. Keep the edges of the mold clean by frequently running a butter knife or similar tool along the grooves to shape the clay into a right angle at the edge of the groove. In the photo to the left you can see this process from several angles.

Making a two piece mold part 1


Often I am asked how I make molds. So I have decided to go through it step by step. I will be putting up the steps that I use to make molds. This will not contain all the little tips and tricks but more of an overall view of mold making. I plan on putting together a more complete tutorial including details of the exact tools, special tricks and tips and about twice as many photos. This tutorial will be available on the website for a small fee.

Today I will begin with the basics. In the photo to the right at the top you can see the board that I use to build my molds on. This is simply a piece of 1 X 6 X 6 (actual dimensions are about 3/4 inch thick X 5 1/2 inches X 5 1/2 inches the nominal size for commercial board called 1 X 6) This board has grooves cut across in all four directions 1/2 inch from the edge and 1/2 inch apart in toward the center leaving about a 2 inch square in the middle without any grooves. The grooves were cut on a table saw to a depth of about 1/8 of an inch and are the width of the saw blade. Depending on the type of saw blade you use this might not be sufficient. They need to be wide enough that the acrylic pieces seen to the right of the board will stand up in the grooves. With my saw blade it was a perfect fit and the grooves are about 1/8 inch wide. After all the grooves are cut the board has been given a couple of coats of varathane on both the top and bottom and in the grooves. Be careful not to fill up the grooves just give them a coat of the sealer. This helps prevent the board from warping. This board set up makes it possible to make molds that are as large as 5 inches square or as small as 2 inches square it also makes it easy to handle and turn so you can see the build up for the mold and get it right. It is not the only way to make molds it is just my way. The four acrylic pieces you see to the right of the mold board are the side boards. These particular ones are about 2 inches by about 5 1/2 inches long. If you are making molds of thicker things you will need ones that are wider (more than 2 inches) These were made by cutting up a piece of acrylic that was purchased at a home improvement store. Be sure to get the thin sheets that are about 3/16 inch thick so they will fit into the mold board grooves or take your mold board with you so you can try the fit.

The second photo shows a pair of heads that I will be making molds from it is often useful to draw a line around the pieces you will be making a mold from to help in the clay buildup. This line should be at the widest point on the side of the item to prevent undercuts. When making molds of regular objects such as round beads or vases this is normally 1/2 way but with more complex shapes such as these heads it is a bit more difficult than that and care must be taken to draw the line on the area that the widest. It can be helpful to take a wooden pencil and shave away the wood on one side to reveal the lead along a long section. Then hold the piece you are going to mold on the table in the orientation that you plan to place it in the mold. Run the pencil around the piece holding the exposed lead against the side of the piece. This should put a line at the widest point. Personally I prefer to draw the line by looking at the piece carefully but this method works for some people. In the photo you can see the line that I have drawn.

The next step is to put a bed of clay on the mold board. I use what is generally referred to as school clay. It is an earthenware clay that is very smooth and has no grog or sand in it. I have been using the same clay for over 10 years and it originally cost me about $7 for 25 lbs so this is a pretty economical way of making molds. I keep my mold clay in a small tupperware box and use it just for making molds. The bed of clay should be about 1/4 inch thick and should be large enough to extend at least 1/4 to 1/2 inch out from the model in all directions. In this mold for heads the model is hollow so it must be filled with the clay. Fill it and flatten off the clay even with the bottom of the neck in this case. After you have the bed of clay on the mold board and a hollow model filled, position the piece(s) that you will be making a mold of on the clay. Pay careful attention that the parting lines that you drew in the previous step are horizontal and not slanted. Also that the pour hole end is vertical and not slanted. You can see this in the third (bottom) photo. Also notice that there is space under the neck of the closest head in the photo, this needs to be filled in with clay.

Friday, June 23, 2006

Anatomy of a China Painted Design part 5


In this photo you can see the final result. The gold has been fired. It is a bit dull in places and will shine better with a bit of polishing. Burnished gold frequently comes out of the kiln with a very dull finish. This has come out pretty bright. To finish off I will polish it with a glass brush. Since the shine of the gold does not show up well in the photo anyway I am not adding another photo of this piece. This piece is now completed.

Anatomy of a China Painted Design part 4


In the last installment I applied the gold underlay to the design. In the top photo here you can see that after firing it look nearly identical to what it did before firing in the previous post. It has flattened a bit and sunk into the glaze slightly although it is still raised there is less definition between it and the glaze at the edges. Now I will apply the gold. The gold I use for this design is a burnished gold. It is 18% pure 24K gold. In the bottom photo you can see the design after it has been applied. You can see that I have also applied white highlights to the roses for this firing. The white enamel that I use requires a lower temperature than does the gold underlay so it must be applied after the underlay is fired. On most china painted roses these highlights would have been wiped out with a rubber tool as the rose was painted, however, I find that in the very small roses I get a better result by using white enamel to put the highlights in at the end of the painting. If the gold covers well this will be the final firing for this piece. I have also put my name on the bottom of the piece for this firing combining what might have been two or more firings.

Tuesday, June 20, 2006

Anatomy of a China Painted design part 3


Last time I covered how china paint is transcluscent and requires multiple applications giving it a depth not seen in underglazes or acrylic paints. By comparing the photos you can see some of this effect. The top photo is after the firing from the photo in the previous post. There was also an additional firing of just the blue since it was still not even. This time I am adding a design feature that is not exactly china paint. It is a raised product that allows me to add raised design features that are intended to be gilded. As you can see from the photo this really dresses up the design that I had before and it is now beginning to look fancy. This product is called underlay for gold. It is also mixed with the glycerine and water (or can be mixed with oils) but to a thicker consistency and although you can apply it with a brush for some types of designs the most common application and the one that I have used here, is with a stylus. The design is built with a series of comma shapes and dots. These will remain raised after firing giving a texture to the finished design. This product is available in both a yellow color and a white. The yellow color is good if you are going to put gold over it because if you miss a tiny spot it won't show. The cobalt blue that is a prominent feature in this particular design will 'eat' the gold so in order to get a good result from gold application something like the gold underlay is necessary as well as being a pleasing addition to the design.

Tuesday, June 13, 2006

Anatomy of a China Painted Design part 2


Continuing with the bowl that was shown previously the photo to the left shows the bowl after the second firing (bottom) and ready for the third firing (top) As you can see by comparing the photo from the previous post with the bowl after the firing you can see that as the paint sinks into the glaze with the firing it also becomes transluscent and the true colors are revealed. Some colors are particularly difficult to obtain smooth even opaque coverage with than others. Cobalt blue is one such color. You will notice that even though the blue has been painted twice it is still pale in some areas. This is one aspect of china painting that makes it take a long time to complete an item, some colors require several coats of paint. This also makes it possible to achieve a lot of depth to a painting.

Before I mentioned that the china paint doesn't 'dry' or become permanent until it is fired. This provides us with some benefits and some drawbacks. There are two types of mediums that are used for china painting. The most common is a collection of various oils. When using oil based mediums turpentine is used to clean the brushes and in some cases to thin various products. The oils used are generally very aeromatic such as clove and lavender oils. This can be a problem for people with sensitivities and allergies. The other mediums that can be used are water based. I use a water based medium for china painting. This consists of glycerine and water. I use the water based mostly because the oils and turpentine annoy my allergies. Using this medium the paint will dry but it is not set or permanent until it is fired this is known as a closed medium (there are also 'closed' oil based mediums). Water based mediums have the benefit that they are not likely to run when fired like an oil based medium may if you apply the medium to heavily. The drawback is that the water based medium dries very quickly so that it is not easily worked and most oil based mediums even so called 'closed' mediums will remain workable for a longer period. An 'Open' oil medium will not dry and will remain workable to some extent until it is fired.

Because the paint is not set and it is applied to a glazed surface it can be changed it before it is fired. It can be wiped off or tiny sections of it can be wiped away to produce highlights or to straighten lines. This is true of both water based and oil based mediums used for china painting. Another benefit is that because it is fired after each painting session the previously applied paint is totally permanent and will not be damaged or removed in subsequent painting. This allows fine detail to be added after the base color has been painted and fired without changing the shading or shape of the previous painting and without smearing or mixing adjoining colors. The detail can be added and adjusted before it is fired. A pattern or line art design can also be applied and fired and subsequently colored without destroying the design. The drawbacks lie mainly in the fact that care must be taken in handling the unfired painting to prevent damaging the unfired painting. Another drawback is the longer time required to complete the artwork.

Sunday, June 11, 2006

The anatomy of a china painted design


Many people do not understand the time that goes into a china painted piece. Most people are familiar with acrylic paints where the entire design can be painted in one sitting. This is not the case with china paints. China paints are a transclucent paint and they do not 'dry' or become permanent until they are fired. To achieve depth and detail in a design it must be fired several times. Just how many depends on the design. So you can see what happens each time I am going to be posting photos of each firing of this bowl. The photos on this post show it after the first firing (top photo)and after the second painting has been applied but before it was fired the second time (bottom photo). I will be showing this after each firing so you can see how it progresses.

Saturday, June 10, 2006

Current Work


Many people ask how much I have to do or what am I working on so I have started this blog to sort of cover what's going on at my studio. I hope to cover what I'm doing and what is new and to answer questions interested parties may have about what I do. So if you have a question feel free to ask.

As many of you may know I'm pretty backed up on orders. Just how backed up am I well the photo to the right is a shot of all the china that I am currently working on for orders that I have. This is not for stock this is for orders.