The mold is now ready to pour the second half. But first we need to put the boards around it and seal it up. Be sure to use acrylic boards that are tall enough to allow 1/2 inch of plaster above the highest point on your model. You can see this by holding up the mold and looking through the side with the acrylic board in place in its groove.
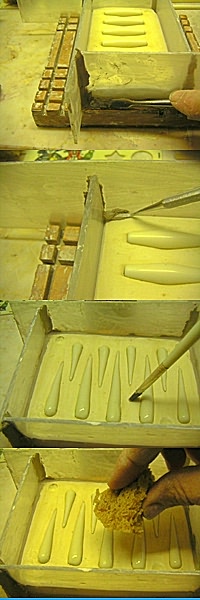
In the top photo you can see how the acrylic boards are sealed on the outside both across the bottom edge and up the corners just as they were for the first half.
In the second photo you can see how the inside is sealed by pressing clay down into the little V shape groove between the mold and the acrylic that is created by filing off the corner of the mold previously. Be sure to pack the clay tightly into this crevice or the plaster will leak out. Pack it down and smooth it out to a nice smooth top surface. Also seal the corners the same as before.
In the third photo you can see the mold release being again applied to the mold and the side boards with a brush.
In the fourth photo you see that the mold release is being sponged off again just prior to pourin the plaster.
If your models are reasonably even front and back and you are pouring plaster into the same mold(s) as you did in for the first half there is no need to measure the molds again just use the same amount of plaster and water as you figured before. And again pour it in the same way.
No comments:
Post a Comment