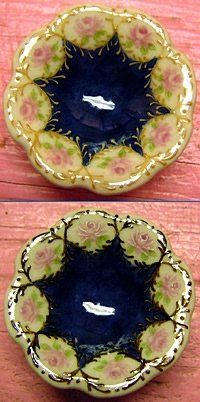
In the last installment I applied the gold underlay to the design. In the top photo here you can see that after firing it look nearly identical to what it did before firing in the previous post. It has flattened a bit and sunk into the glaze slightly although it is still raised there is less definition between it and the glaze at the edges. Now I will apply the gold. The gold I use for this design is a burnished gold. It is 18% pure 24K gold. In the bottom photo you can see the design after it has been applied. You can see that I have also applied white highlights to the roses for this firing. The white enamel that I use requires a lower temperature than does the gold underlay so it must be applied after the underlay is fired. On most china painted roses these highlights would have been wiped out with a rubber tool as the rose was painted, however, I find that in the very small roses I get a better result by using white enamel to put the highlights in at the end of the painting. If the gold covers well this will be the final firing for this piece. I have also put my name on the bottom of the piece for this firing combining what might have been two or more firings.
No comments:
Post a Comment